How to Convert Your 3D Blu-rays for Watching on Apple Vision Pro
Mac workflow for converting 3D Blu-rays to Full Side-by-Side or Spatial Video for watching in 3D in Meta Quest or Apple Vision Pro.

3D movie fans on the Mac have had a rough time for years if they wanted to watch their 3D Blu-ray collection in a VR headset. The only reliable path ran through Windows — with MakeMKV to extract the disc, and BD3D2MK3D to generate a side-by-side file for VR playback.
On macOS, things weren’t so simple. A handful of apps claimed to perform this conversion, but they either flat-out didn't do what they claimed on the tin, or seemed sketchy and filled with malware. For that reason, some (like myself) kept a PC around for this single purpose.
I am trying to improve the situation for Mac users with my app MakeSBS3D that is currently in TestFlight beta testing. Paired with MakeMKV, it gives you an end-to-end Mac workflow for creating 3D video files from your own legally owned discs without the need to reach for that PC.
MakeSBS3D requires a Mac running Sequoia or Tahoe, and can output either Full Side-by-Side video (ideal for players like SKYBOX or Moon VR Player on Apple Vision Pro and Meta Quest) or Spatial Video, Apple’s native 3D format for immersive playback.
Extract the 3D MKV with MakeMKV
The first step is to create a digital copy of your 3D Blu-ray movie that preserves the stereoscopic video data. This is where MakeMKV comes in.
- Open MakeMKV and insert your 3D Blu-ray into your Blu-ray drive. The app will scan the disc and list the available titles.
- Once it’s done, look for the main movie title — typically the largest file.
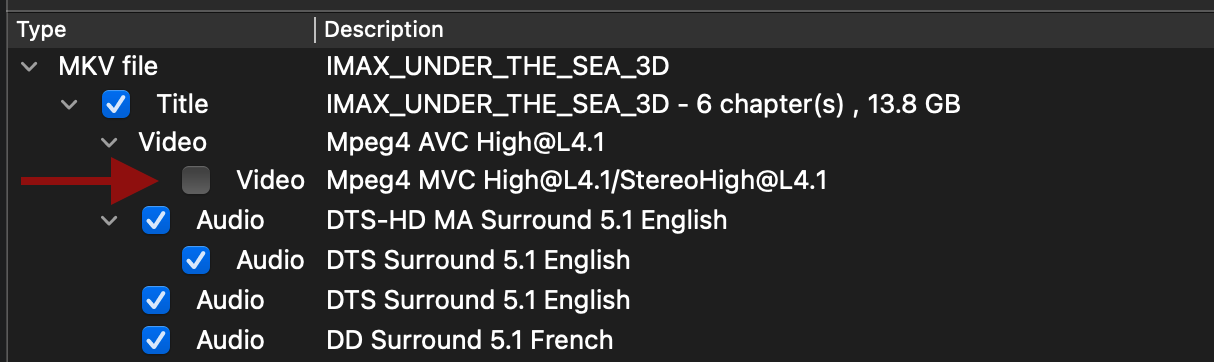
- Select the title and expand it by clicking the small caret (▶︎) next to it to reveal all available tracks and streams.
- Under the Video section, manually check the video option containing the text “Mpeg4 MVC”.
- Finally, choose an output folder and click Make MKV to begin the rip.
The process usually takes less than an hour, and when it’s finished, you’ll have a single 3D MKV file containing both left and right video views, plus audio tracks.
Convert the 3D MKV with MakeSBS3D
With your 3D MKV file ready, the next step is to launch MakeSBS3D and convert it into a format suitable for 3D playback on headsets or 3D-compatible devices.
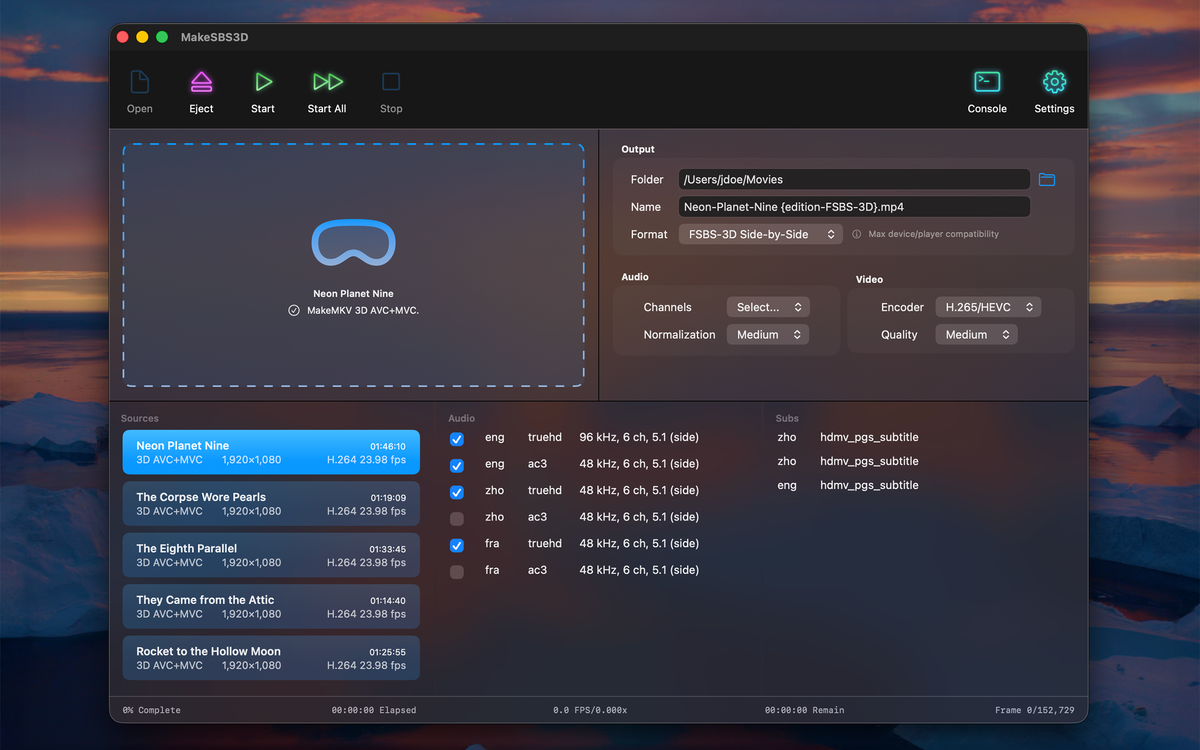
- Open MakeSBS3D and click the Open button or the main information area to get a file browser to find and select the 3D MKV file(s) you'd like to process. Another option is to simply drag and drop the files into the main information area from the Finder.
- MakeSBS3D scans each file to verify that it’s a valid MakeMKV file.
- Select the verified files you want to process.
Output
In the Output section, you can select output folder and file name. You also get to select output format:
FSBS-3D Side-by-Side (.mp4)
- Recommended for most.
- Converts by streaming, uses minimal disk space, and completes faster.
- Works with the widest range of 3D playback apps (e.g., SKYBOX or Moon VR Player on Vision Pro or Meta Quest).
MV-HEVC Spatial Video (.mov)
- Converts to a Full SBS intermediate, then to Spatial Video.
- Takes longer and requires more temporary disk space.
- Produces a file in Apple’s native 3D format.
Audio
The Audio section controls which language tracks are included, and the amount of audio processing that is applied.
Channels
Select Main, All, or Select for which audio channels should be included. Select will reveal checkboxes for all audio tracks for precise track selection.
Normalization
Normalization lets you control the amount of dynamic range between silent and loud parts. None or Light maintains a higher dynamic range. Medium and Strong uses increasingly aggressive settings. Medium is the default and provides a good overall compromise.
Video
The Video section lets you set which video encoder is used and what overall quality setting is applied.
Encoder
Encoder lets you select which video encoder should be used:
- H.265/HEVC is newer and provides better video quality with smaller output files for a given compression level and is therefore the default option. It's slightly slower to process though, so if you're in a hurry, you might want to choose H.264.
- H.264/AVC is provided as an option for if you're in a hurry, since it's faster than H.265. It produces larger files though, and at a lower quality for a given compression level.
If you'd like to change any of the audio and video defaults, click the Settings button.
Processing
- When output options look good, click Start to convert the currently selected file or Start All to process all opened files.
- While running, MakeSBS3D displays progress percentage, conversion speed, elapsed time, and estimated remaining time.
- Stop halts conversion at any time, and Eject clears the current file list.
Once conversion completes, your movie file will be ready to be transferred to your VR headset for playback in your movie theater player of choice. 🎉